Mimosoan, Cindy Baudoin, just might win an Emmy for her performance on WHHI-TV's 'Golf Center'. We would like to thank Cindy for taking the time to appear on the show and for promoting the Mimosa Clinics.
News & Updates
Effective Green Reading
This past week we went over 'How to Effectively Read Greens'. At first this can seem complicated but as many of you discovered is rather quite easy once you do it a few times. To review, the three step process is as follows:
*NOTE: in the rare event you miss the hole the ball would pass the hole by up to 22". If you are missing putts and the ball is going past the hole more than 22" you are hitting it to hard and need to go back to your metronome training.
By repeating this process on all your putts it will 1) help you make more putts 2) allow you to have more fun because it is much more exciting to look up and see the ball going towards the hole with a chance to go in, and 3) will eliminate doubt when standing over the ball wondering if you are aimed in the right direction. Should you have any questions or comments feel free to post them in the 'Join the discussion...' box below.
This past week we went over 'How to Effectively Read Greens'. At first this can seem complicated but as many of you discovered is rather quite easy once you do it a few times. To review, the three step process is as follows:
- Step #1 (Pour the Water) - If you were to pour water onto the putting green where would it flow? Find the highest and lowest points of the hole; i.e. 6 o'clock (lowest) and 12 o'clock (highest). This would equate to a straight uphill/downhill putt and is called the Zero Break Line (ZBL).
- Step #2 (Perpendicular) - Go to either 3 o'clock or 9 o'clock of equal distance from the hole as your ball and imagine hitting a ball straight at the hole. How far below the hole was the ball as it crossed over the ZBL; 1", 3", 6"?
- Step #3 (Equal distance above) - If your ball was 3" below the hole as it crossed over the ZBL (zero break line) go equal distance above the hole and that is the break point for every putt (of equal distance) around the entire hole.
*NOTE: in the rare event you miss the hole the ball would pass the hole by up to 22". If you are missing putts and the ball is going past the hole more than 22" you are hitting it to hard and need to go back to your metronome training.
By repeating this process on all your putts it will 1) help you make more putts 2) allow you to have more fun because it is much more exciting to look up and see the ball going towards the hole with a chance to go in, and 3) will eliminate doubt when standing over the ball wondering if you are aimed in the right direction. Should you have any questions or comments feel free to post them in the 'Join the discussion...' box below.
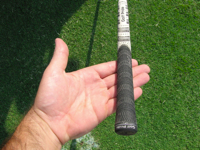
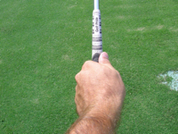
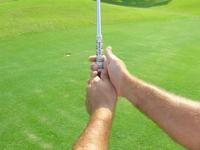
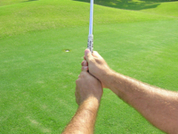
full swing- how to grip the club
#1
#2
#3
#4
|
#1 -Make sure the grip goes through the first digit of your index finger and the second digit (the midget digit) of your little finger. Your fingers should be under the grip. #2 - As you close your hand the pad of your hand should be on top of the grip with your left thumb to the right of the center of the shaft. #3 - The 'Golfers Line' (what fortune tellers call your lifeline) of your right hand will fall on top of your left thumb. Notice how your right hand fingers are also now underneath the grip. #4 - Close your right hand and you will notice how your right thumb falls to the left of the center of the shaft. |
PUtting and head position
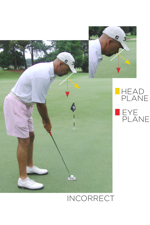
NO!!!
(Click on the picture to enlarge)
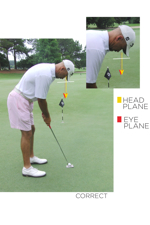
YES!!!
(Click on the picture to enlarge)
|
The photo to the left illustrates how NOT to position the head/eyes at address. Notice how the eye and head planes do NOT coincide. The eyes are looking down at the ball while the plane of the head is different. This photo shows a less than ideal head/eye position.
In the photo to the left you will notice how the plane of the eyes and the plane of the head are one in the same. The chin is tucked to allow this to happen and the eyes are also vertically over the ball. This is an ideal head position. |
7/7/2013
To all the Ladies that attended the Chipping Clinic this past Saturday we would like to thank you or doing so. You all did a fabulous job with your ball position and shot making and we look forward to hearing how well you chipped during the week while out on the links. As a reminder below are some of the main things we discussed.
BALL POSITIONS - By altering your ball position only half a ball-width backward or forward from center, you can use the same swing to achieve a variety of ball trajectories, spin and roll. There are three such positions:


|
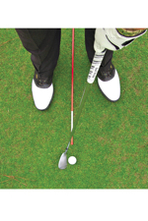
1. Middle ball position; i.e. middle of the ball placed directly in middle of stance so your eyes are looking directly onto the top of the ball. The middle of the ball is in the middle of the stance because the tangent point of the swing arc on this shot is also in the middle of the stance. Since half of the ball is behind the middle of the stance, the descending club contacts the ball slightly prior to contacting the ground and produces a repeatable mid ball flight.
2. Back ball position; i.e. ball moved half a ball-width back from middle of stance. With this ball position, your eyes are looking down directly onto the front of the ball (remember: your head does not move; only the ball position moves!) at address. Here, the club head contacts the ball even more prior to becoming tangent to the ground, thereby de-lofting the clubface, lowering trajectory, reducing spin and increasing roll. 3. Forward ball position; i.e. ball moved half a ball-width forward from middle-of-stance. With this ball position, your eyes (again with a steady head) are looking down directly at the back of the ball during the stroke. Here the club head bottoms out at the same middle-stance position, but because the back of the ball is at this point, the club is bottoming out just as it contacts the ball, producing increased loft and spin but less roll.
|
5/25/13 Chipping-Face Angles
We had a wonderful clinic this morning on 'Chipping-Face Angles'. All the
Ladies in attendance learned how easy it is to chip well. In addition
everyone learned how to turn one club into 6! For a review of todays
clinic and to improve your chipping read our article on 'The Art of Scoring:
Chipping'

To read 'The Art of Scoring: Chipping' Click the photo above.
5/18/13 Stretching for Golf
Thank you to all the ladies that attended the Full Swing-Trajectory Control
Clinic this morning. It was nice to see your games progress and we look
forward to hearing good news of your improvement in the weeks to come. A
topic discussion was stretching and which stretches were most beneficial for
golf. Below are a few stretches to help with your golf game and overall
well being.
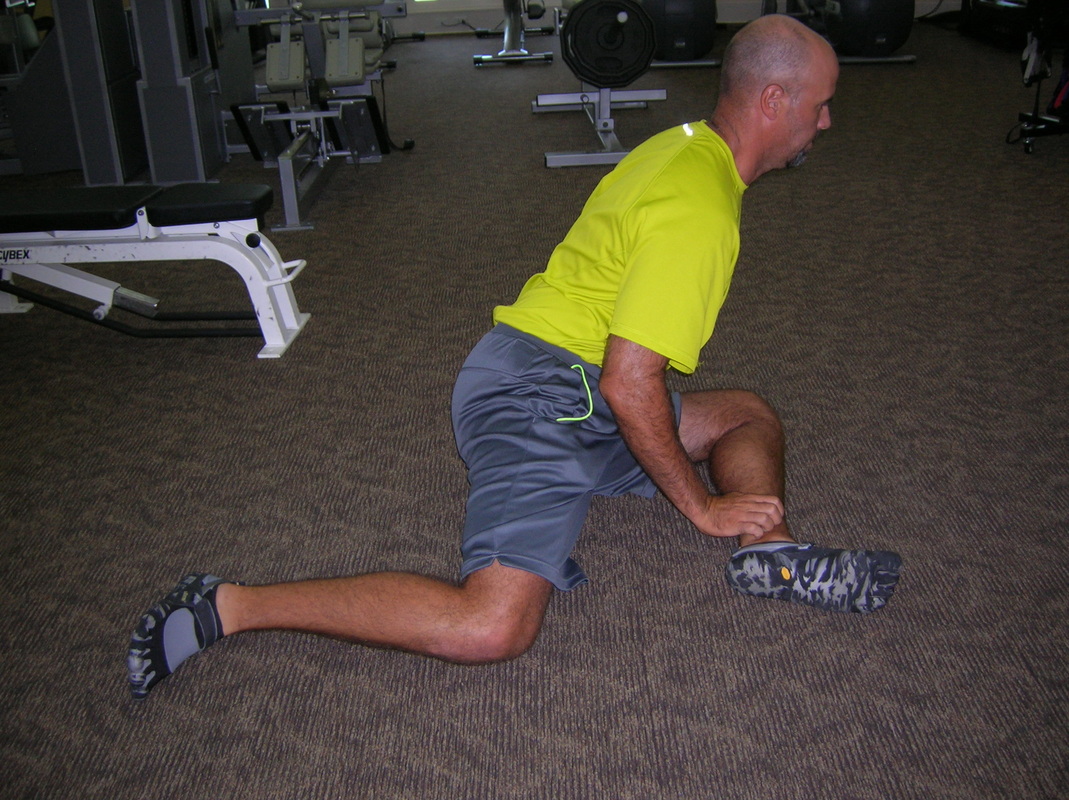
90/90 Stretch
|
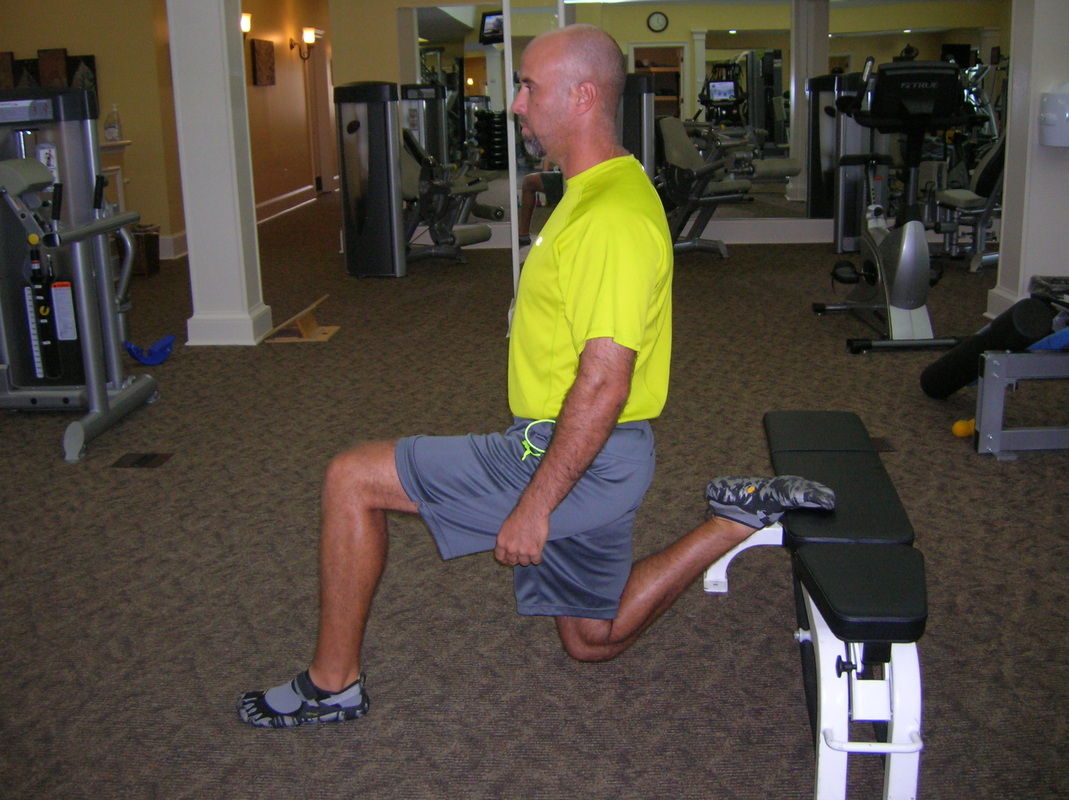
Thigh Stretch
|
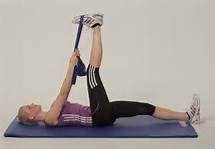
Supine Hamstring Stretch
|
Stretching Instructions
It is recommended each stretched position be held for two minutes on each side and each stretch be done twice on each side. For example, in the 90/90 Stretch the left leg is in front as you lean forward until you feel a stretch in the left glute. Once the stretch is felt hold for two minutes then switch to the right leg. Upon completion of stretching the right leg, move back to the left leg and repeat. Follow this procedure for each of the stretches above. By doing these stretches you will find it easier to rotate throughout your swing.
NOTE: You should consult your physician prior to any exercise or stretching program.
NOTE: You should consult your physician prior to any exercise or stretching program.
